Here you'll find some resources about the tour, how 360° images work, and the equipment and techniques we use to shoot the scenes.
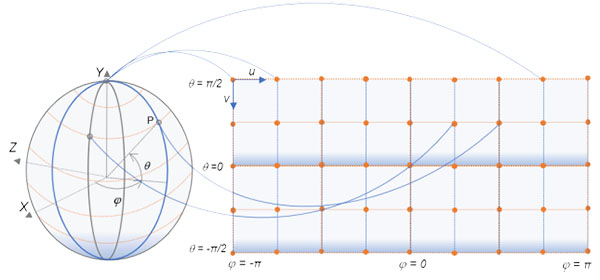
The 360° scenes are actually equirectangular images with a ratio of exactly 2:1, providing a 360° horizontal field of view, and a 180° vertical field of view. The images are created by stitching together a set of photos that are taken all around the central point in special software. The minimum image size in the tour is 200MP (20,000 pixels x 10,000 pixels), however the more recent scenes are 392MP (28,000 pixels x 14,000 pixels).
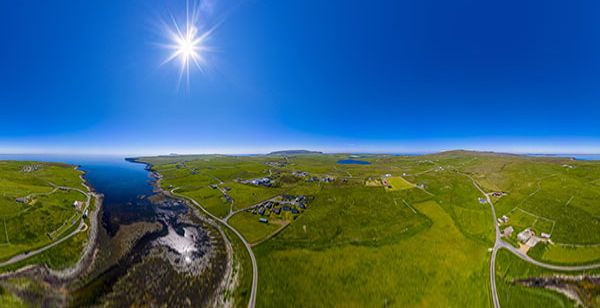
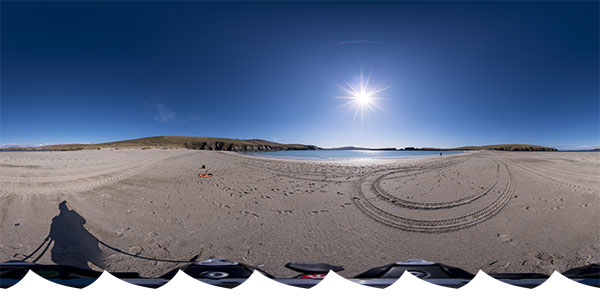
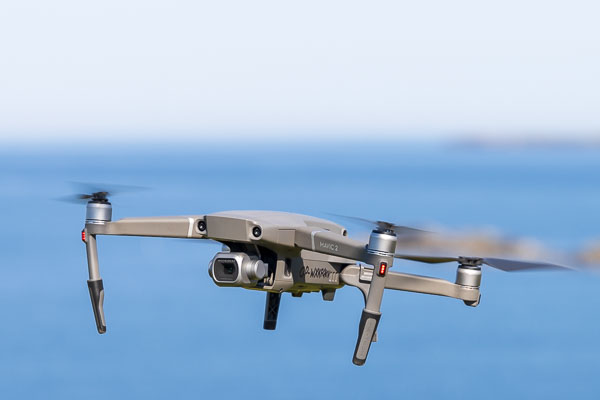
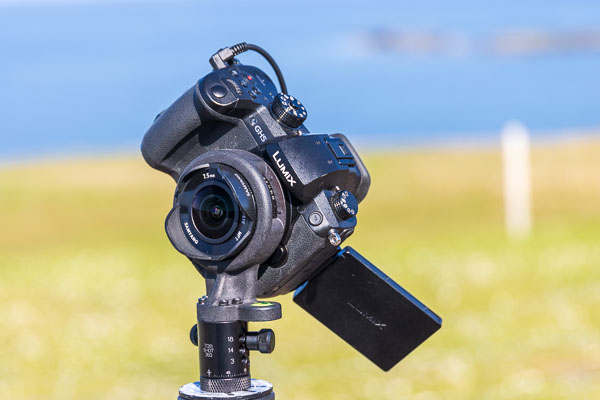
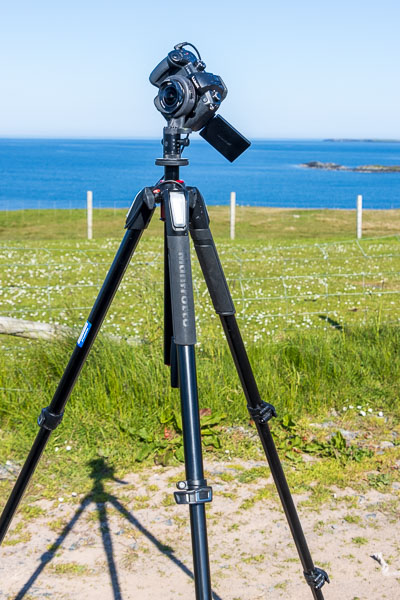
In the air at 400' (120m) our drone shoots 26 images from 35° above the horizon to the ground. It uses a programmed grid pattern to ensure the images have enough overlap to stitch together. Whilst the drone is shooting from the sky, we use a ultra-wide angle lens attached to a special mount to take eight pictures of the sky which will be stitched into a separate 360° x 180° image.
The aerial images are all shot in raw format, and they are developed in Adobe Lightroom ensuring the same settings are used for all the images. The photos are then imported into an application that stitches them into a 360° x 180° 'equirectangular' image. At this point anything above 35° from the horizon is missing as the drone can't shoot straight up.
The process is repeated with the eight sky images shot in raw from the ground, and resized to the same horizontal dimensions as the aerial image. The two images are then colour matched and blended together in Adobe Photoshop to produce a full 360° by 180° image.

It takes a lot less time to shoot the images than it does to process them! The drone takes around a minute to take the 26 images from the sky, and it takes just a few seconds to shoot the eight images from the ground. Processing from start to finish takes around 45 minutes, a lot of work goes into ensuring the horizon is straight and there are no stitching errors. The completed 2:1 equirectangular images are saved as 16bit TIFF files, these are then used to create the multi-resolution tiles that the web server sends to your device when viewing. A high resolution source image may have over 3,000 multi-resolution tiles making up the scene.
Particular attention has to be paid to the sun position as this is used to align the scene to the map. In Autumn, Winter and Spring the sun will appear in the aerial image, however in the Summer daytime the sun will only show up in the ground image. In clear weather it's easy to see the rays from the sun, but if the sun is obscured it can be difficult to align. The other issue with shooting the sky from the ground is parallax, clouds will appear at a slightly different position than from the sky. We use a technique called Viewpoint Correction to optimise the position of the sky, which effectively skews the sky image so it aligns correctly with the aerial image.
Three applications are used in the panorama creation workflow: Adobe Lightroom Classic is used for developing the raw images; PTGui Pro is used to create the panorama for the aerial and ground shots, this is a great application that has a range of tools to create a perfect image. Once the sky and ground panoramas are complete they are exported s 16bit TIFF files to retain all the colour and tone information for further processing without degrading image quality. The third application is Adobe Photoshop CC, this is used to blend the two panoramas together, a layer mask is used with a gradient that merges the two together. Colour matching is done with the sky at this stage, so it matches perfectly with the aerial shot. The offset filter is used to align the sun, then the two layers are merged. The dodge tool is used to darken the ground 180° from the sun, shooting with the sun directly behind creates a halo effect with a bright patch on the ground.
After merging and any correction the panorama is imported back into PTGui Pro to straighten the horizon. This is not required if the scene doesn't have an open area of sea, but as most of them do this is an important final stage. The completed scene is saved as a compressed 16bit TIFF file, the newest are around 2.1GB in size!
The tour itself is created in Panotour Pro. Unfortunately this application is no longer supported, however the core runs on KRPano which is actively being developed. We have created some of our own plugins for it, and we manually edit the xml files to optimise the tour across all platforms and devices.

The tour now lives on its own dedicated virtual server with 8 cpu cores, 16GB of RAM and a 240GB SSD. The operating system is Ubuntu 20.06.4 LTS and it uses the Apache web server. All web traffic to and from the server uses 256bit end to end encryption with a trusted SSL certificate. Short of the time it takes to fly and produce the tour (which is more of a labour of love than anything else), the biggest cost is the server. Up to now we have kept the tour ad free, so please consider donating to the server costs. See the user guide home page for details.
Several drones have been used to create the tour: initially the DJI Inspire 2, followed by the DJI Mavic Pro Platinum, the DJI Mavic 2 Pro and currently with the Mavic 3 Pro. With its MFT sensor 20MP Hasselblad camera, the Mavic 3 Pro is ideal for creating stunning images. It requires 25 images to create the sphere, however as mentioned above it can't shoot upwards more than 35° so we have to shoot the sky from the ground.
The sky is shot using a Panasonic GH5 mirrorless camera fitted with a 7.5mm rectilinear fisheye lens on a special mount. The camera is angled at 37° and produces a vertical field of view of around 170°. Since we're only interested in the sky there's no need to fill in the bottom of the image (the nadir). Once processed the 2:1 image is 14,000 pixels by 7,000 pixels, we use enlarging software (Topaz Gigapixel AI) to resize it to 28,000 pixels x 14,000 pixels.
As mentioned above, the panoramic scene is actually a 2:1 equirectangular image representing 360° horizontally and 180° vertically. The left side of the image joins perfectly with the right side so there is no line or seam. When you view the scene the viewer application (in this case KRPano Viewer) projects the 2:1 image onto a sphere or a cube that can be manipulated in the user interface. This is known as a 'spherical' projection, and the source image will appear heavily distorted at the top and bottom until it is projected. In fact the only part of the image that is not distorted in some way is at the equator, the horizontal centreline, planar distortion increases above and below this line. It is possible to use a 'Mercator' projection to view the scene in 2D with less distortion, however it does crop out the very top and bottom of the image. Areas at the poles of the sphere (image) appear larger than they really are, the same as the classic map of the world where Greenland looks the same size as Africa!
The 2:1 image can be projected in different ways (as shown on the Maps and Views page), use the scene context menu to explore the various projections.